Saturday 26 October 2019

Modifying my Giant Propel

I am lucky enough to have been able to afford a really nice bike - a 2014 Giant Propel, with Di2. Given its specification (and cost) i have generally only ridden it in good weather and kept it almost stock. I have made a few small changes over the 4 years I have had it but I have started to make some changes as its worn out or other drivers have forced something

Here its is after the 1st or 2nd ride:


 Here it is about 9 months later - still no changes


 Here it is when I added a 4iiii left hand crank power meter


Here I an riding it at Mallory Park race circuit - still no major changes


In 2018 I bough the "official" Giant rubber bungs to plug the holes in the frame for the Giant Cadence sensor - these bungs fit in the non-drive side chainstay. I got these from www.giantbikespares.com. The postage cost as much as the parts. I got this because I was now sometimes riding the bike when it was damp and did not want to get water in the frame


This year (so about 3.5 years after I bought the bike) I finally gave up and downsized the chain rings from 52-36 to a more normal Compact (50-34). I bought Ultegra rings even though the cheaper 105 rings are completely compatible to keep the specification correct

The main difference between the Ultegra rings (above) and the 105 (not shown) is that the Ultegra big ring is a metal/nylon composite whilst the 105 is all metal (with integral strengthening "ribs"). You can see the nylon quite clearly above. I also needed to change the chain at the same time as it had done over 4000 miles, although the chain wear checker did not suggest that it was over the recommended 0.75%. Obviously changing the front rings (a 2 tooth reduction on both rings) meant I needed to also look at the chain length and the position of the front dérailleur. I took some photos before for all the gear extremes (52-28, 52-11, 36-28 and 36-11) to look at the original chain relationship and to compare to what it was going to be like with the new extremes  (50-28, 50-11, 34-28 and 34-11).

52-11

52-28

36-28

36-11
 I decided to start with the same chain length as for the 52-36 chainset when I fitted the 50-34 rings:

50-11

50-28

34-28

34-28
It's not perfect in the 34-11 combination and the chain could probably be ideally 2 links shorter, but it functions completely OK (and in reality I never use the 34-11 gear on the road anyway). It also means  that should I found a sudden burst of youth, strength and knees, I can refit the 52-36 rings without changing the chain again.

I also noticed that although the original chain was not over 0.75% wear, the new chain actually ran more quietly and smoothly and shifted better, so clearly the wear indicator method does not always show a true real world level of wear.

Some careful photos also meant that I could reset the front dérailleur into the new lower position:


There was one real benefit here with Di2 - this was that I didn't need to do anything to reset the cable length like I wild have had to with a traditional mechanical set up

This photo is with the original 52 ring so I set the same height gap for the 50 tooth ring

The change to the smaller front chain rings is by far the biggest change to the bike - and the outcome is that it is easier for me to ride and I can use more of the cassette, so it was money well spent. For info I got the rings from Rose Bikes (ignore the .uk domain - they are a German company). Its clear that although the 6800 series Ultegra is only one generation old it's already seen as obsolete as I could not get these rings in the UK

I have also needed to swap the rear tyre out - it was still just about OK at 4600 miles but the wear indicator was long since gone and the tread area no longer round:


The tyres are Giant P-SL1 700 x 23c. These are around £30 each and are starting to be replaced by P-SL2. However by compete chance I looked on EBay and saw a pair of almost new P-SL1 tyres. I bid and got the pair for only £22. They really had done only a few 100 miles at most - what a bargain

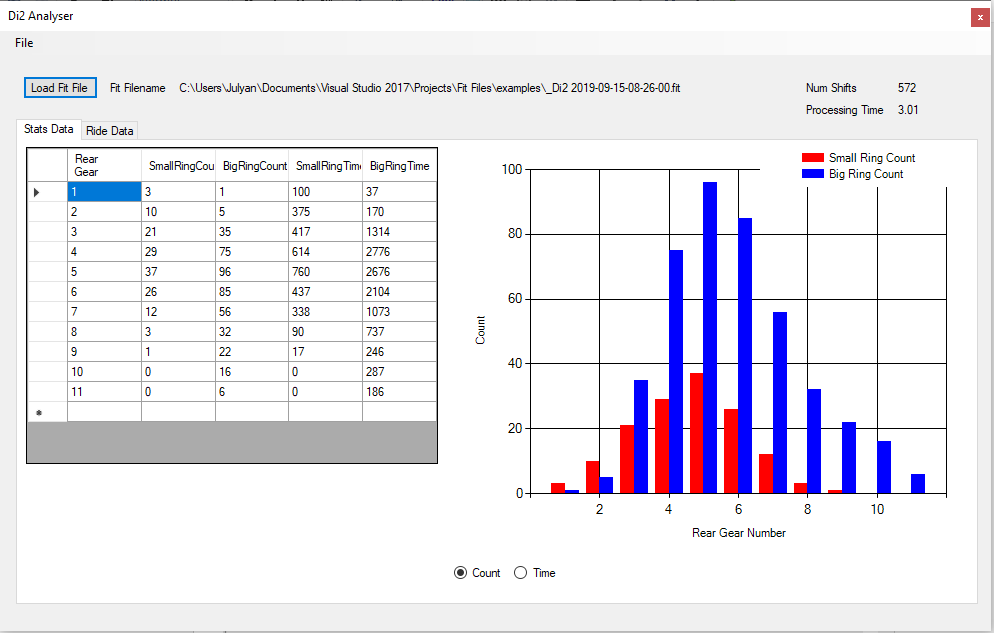
The final changes I have done are to fit a Shimano SM-EWW01 unit so I could read the gear position and other Di2 data into my Garmin. This is documented here: di2-monitoring


So - my bike is still almost as built but has some small changes, some more visible than others. It's a great bike but as I will freely admit - a better bike that I am rider

Painting a Bike

My son has had a Boardman Road Race and has beat the living daylights out of it over 6-7 years. It has been used and abused and was looking very sorry for itself. By the summer of 2019 a lot of paint was coming off the top tube due to corrosion and there were many scratches and marks all over the rest of the frame. As well as the cosmetic damage the bike needed a very thorough service - for example it had a seized front derailleur, and a rounded rear brake bolt meant we could not remove the rear calliper were some of the issues

I wanted a bit of as project so offered to completely strip the bike, strip the paint from the frame, repaint and rebuild, which is what I did.

Here's some pictures of the state of the frame at the start (these were taken to record the location of the Boardman transfers):

You can see here the state of the top tube


These pictures were taken after I had stripped pretty well everything off the frame. It was in a very bad way. I could only get one of the Bottom Bracket bearings out myself  - the other I gave up on and took it to a bike shop. There was a lot of banging for 5-10 minutes to remove it. I only had the plastic tool and a "half" round spanner for it for these smaller Shimano Bottom brackets as follows:

I just could not get the cup to move.I have since bought some more and hopefully better tools as the visit to the LBS cost £10:

This is a Park Tools  BBT-69.2 Tool 3/8" drive

This is the Park Tools BBT-9 tool - identical size to the BB62 but also fits centre lock disk lock rings
Link for the Park Tools:
BBT-69.2 - Link
BBT-9 - Link

I could not remove the bottle cage bolts with the cage in place so I cut the cages off (they were nylon) and ended up having to drill the bolts out (carefully). I needed to re-tap the threads after this. The screw that held the bottom bracket cable guide did come out with an impact driver after a soak with penetrating oil.

The rear brake retention nut had rounded off the internal hex.
Once the brake cable was removed I could remove the brake calliper itself. I then screwed in a standard bolt into the nut. Plan A was to hammer the nut out using the bolt but this was not shifting it. Plan B was to place a thick metal plate on the rear of the seat stays behind the nut and then apply a G Clamp to the head of the bolt and the metal plate. In this way I could get a lot of static pressure onto the bolt. Once this was as tight as I could get it I then tapped the clamp to shock the nut through the bolt. This broke the corrosion holding it in place and I could then tighten the clamp a little more and push the nut out pretty easily. I needed to use an 8mm drill (carefully) from the rear to clean the corrosion out from the frame locating hole and I greased it thoroughly before reassembly. This close up (after priming) shows that there is a sufficient gap between where the nut sits flush and the seat stays


The BB, bottle cage and cable guide bolts were really hard to remove and took most of a morning, a lot of swearing and sweat. Although the rear brake nut was also tight it did come out relatively easily using the Plan B approach

Having got all the fittings removed from the frame I spent a long tine stripping the paint off back to the bare metal. I used a combination of a delta sander, standard paint stripper, a fine grit emery sponge pad (by hand) and a Dremel with a small wire brush attachment and sanding band:


The use of the Dremel and the attachments was surprisingly effective and durable. The sanding band was quite course but scored the paint well so that the paint stripper could get right into it and remove it with only a couple of applications. The wire brush lasted for the whole frame and whilst looked tired by the end was still effective. It was really useful to get into all the frame joints and remove paint where emery paper just could not get to. Whilst it removed the paint it did not scratch the frame itself.

It took a few hours over a couple of weekends but I was able to get the frame right back to shiny bare metal. I finished the job with a fine grit sanding pad.The following pictures show it hanging in the garage ready for painting. I hung it from the head tube via some studding and string and put some more studding through the rear axle so I could guide and control the frame. The light and my phone's camera is not that great but the frame is fully prepared and stripped and has been cleaned with methylated spirits. I was surprised how good the frame was under the paint - I had assumed that the worst of the visible corrosion was more than surface deep but actually it needed no more than a rub down with the emery pad to bring back to smooth metal. I did the stripping on the pation in front of the garage to avoided splashing paint stripper and dust over the inside of the garage. Here's the result:
 
The whole frame ready for painting

Detail of the head tube and bottom bracket

Detail of the rear dropout and studding

Detail of the head tube
I used Spray.Bike paint for the job. I'd seen some recommendations on line and read the website (Website is Here) very carefully. Back in my youth I'd repainted a bike using standard rattle can car paints and the job was not that great. However I felt pretty positive about this and other people had also reported good results. 

I decided that despite the comment that "Spray.Bike paint will adhere to most raw metal and painted surfaces without any major pre-prep." I decided that I would use the Primer and using primer would also give me a bit of spraying practice prior to applying the more critical top coat. My son had chosen the matte black as the colour to use:

I bought 1 can of primer, 2 of of the black topcoat and 1 of the transparent Matte Finish. The instructions said that 1 400ml can would suffice for a frame, but I wanted to be sure that I had plenty of the top coat. This came to about £40 all in sop not exactly cheap. I also bought a couple of cheap face masks and used my older glasses just in case

The key message about use and application was the distance of the nozzle from the frame - and it was different for the primer and top coats.

I initially sprayed the frame with the primer. To be honest when I was in the correct spray range it covered well and evenly - I had one small run in an awkward place that I addressed following the instructions. The paint really is touch dry after a few minutes but I waited 3-4 hours before applying the top coat.


I got a similarly good result although there were a few areas where the surface was visibly "powdery" as I had not applied enough paint. It is a lot easy to spray the main tubes (top, down and seat) as these are a bigger target to aim for. The narrow seat and chain stays are where I needed a second go and this is where I needed to respray over these to improve the outcome. Here's the results after the first and second sprays:


Bottom bracket detail

Head tube, top and down tube detail


Seat post detail


Head Tube detail (the white mark is a loose thread from a sheet, not a scratch)

This is the top of fork
The next day I applied the transparent finish and a few hours later was ready to rebuild the bike.

The very nature of an aerosol spray on quite a narrow target ,means that there is quite a lot of missed spray that was on the garage floor. I had hung the frame from the garage roof and surrounded it on 3 sides with old bedsheets. This was just about OK. By the time the overspray that missed the frame had landed on the floor it was basically dry dust and could be swept up easily. However - do not try and spray without protecting everything around the area

This is the easy part - I have built a few bikes in the past years (see here) and in this case it was just a case of refitting the original (or replacement) parts. I used a lot of grease on all the threaded joints and threaded the new bottom bracket in and out a few times to ensure that both the male and female threads were well greased to make it easier to remove the next time

I was geared up to get some Boardman Transfers for the frame (loads on EBay) but my son decided he wanted it to be unmarked so its currently fully "stealth". However I don't currently have any photos of the completed bike after all this work

In overall time this was a 3-4 month project. In actual work time it was probably
2-3 weekend mornings stripping the bike and preparing the frame
2 weekend mornings painting
1 weekend morning rebuilding the bike

I'd really recommend the Spray.Bike paint - easy to use and gave a good result. The project was for me very therapeutic - I enjoy this sort of job - and my son was very pleased with the outcome

Tuesday 22 October 2019

FIT File Decoder for Di2 Data

I have written a .fit file decoder to read the Di2 gear shift data from it:

To use it press the "Load Fit File" button, browse to a .fit file and wait a few seconds.

Here's a few screenshots of the Stats Data tab:


These screen shots show the "Stats Page" of the same data file-this shows a data table and a bar chart that shows either the number of times or the duration of each gear selected. There are 2 radio buttons to switch the chart between Time and Count

There's a few information text boxes to report the name of the .fit file processed, the number of shifts found and the processing time required to decode the .fit file and generate the reports and charts.


The tab "Ride data" one shows a time based shift profile for which gear has been selected on both the rear and front gears. Above the chart is a data table of all time based data read from the .fit file. Right clicking on the data table will show a menu allowing the data to be exported as a text file

The "File" menu offers 3 options:


  • "Quit" is self-explanatory 
  • "Set Verbosity" allows you to generate some log files during decoding. The default option is Normal which will generate minimal log files. High will generate more files and a very large file that will help debug issues (for the programmer at least). Please note that this High Verbosity option will take a very long time even on quite Small .fit file. With Normal selected decoding may take 5-10 seconds, but the same file with High selected will take 10-15 minutes potentially
  • "Show Working Folder" will open an Explorer window showing the files generated:


For information:
  • _messages is the log file
  • _event_dt is the file containing Di2 shift data
  • _gear_dt is the file containing the summary (count and time) of the gear shifts
  • _record_dt is the file containing the time based data (speed, power etc AND the event data (shifts) combined)
The core fit file reader code came from the ANT SDK - it provides a library and some examples in various languages. I have adapted the "decode" example and created this Windows application

It seems robust and reliable with the testing I have done.

Here is some description of what it does and some potential issues
  • Its only been tested on .fit files from a Garmin 1030
  • Occasionally an unrealistic gear number is read in the Event data - like 255. In this case the software overwrites this and replaces it with the previous valid gear number. A message is placed in the _messages file, e.g.:
  • Correcting an error state in FrontGrearNumber at row number: 365
  • It currently only processes Records (time based data) and Event. Other data is available like "UserProfile" for example. This is future work
  • Some data fields in Records are "unknown". No data for these records is used/stored.
  • The date and time in the .fit file are based on "FIT_Base_Time" - this excludes localisation from what I can see so some of my Strava data files are 1 hour different to the time stamp in the .fit file. This will need to be addressed to align the .fit data with Strava data (see below)
  • Processing with the High verbosity setting is very very slow. I need to reduce the file IO to speed this up. With the Record and Event data this is stored in memory during the decoding and then written to file on completion. These files are a few 110Kbyte so this is OK but the High Verbose _message file is 10's of Mbyte so an alternative is required
FeedbackIf you use this and have issues or suggestions please add as a comment to the Blog and I'll try and address. If you have issues and you don't use a Garmin 1030 I might need an example of the file you use

Download
Please see Di2 Analyser Application (280 KByte) to get a ready built executable (in a zip file) to copy to a folder and run. (Link is on my Google Drive)


Source code:
Please see Di2 Analyser Project to (2102 KByte) get a MS Visual Studio Solution and source files ready to be edited, built, recompiled etc. to your own desire. Note I built it with VS 2017 Community. I have a copy of VS 2019 Community but did not use itr for this application
I am NOT a programmer, I am an engineer who CAN programme - please don't criticise any of the coding in the Main_Form.c file (the one I wrote). (Link is on my Google Drive)

Planned Further Work:
I will add this feature into my Strava Data Tool also available here on this Blog
I will improve how the High Verbosity level writes the data to improve the performance 
I will add decoding of some of the other data fields 
I will add further error checking 
Convert to use a database rather than files (offers better control, management and post processing)