On Friday 28 June for the first time ever I chose to commute in the rain.
Despite being a pretty committed cyclist doing 1000's of miles a year I rarely choose to start a ride in the wet so this was quite a step change.
On this occasion I had chosen not to cycle the day before (Thursday) as the forecast showed a bright start but turning to rain at home time. I was also a bit tired so on the Thursday I decided that I'd cycle if I woke in time without the alarm. I didn't so I drove and was pretty grateful given the quantity of rain at home time.
However the forecast for Friday was a damp/wet start but drying out, and Noel was going to ride in as well, suggesting that we rode back "the long way". So I set my alarm for 5.45am and when it went off I looked out of the window - it was raining but looked light so I decided I'd risk the cycle. After some breakfast and a shave I went to get my bike from the garage and whilst it was still raining it felt like light drizzle. However once I really got going it was clearly raining a lot harder than it had initially appeared.
By Hampton In Arden I was pretty wet - not cold as it was about 12Deg C, but wet. I'd put my overshoes on but these were overcome - mostly I think from water rolling down my legs. This was despite mudguards on my bike. My pocket rocket held up as my upper body was warm and dry - my arms seemed wet and I was unable to tell whether this was sweat or leaks around the wrists
It was also the first test of my Altura Pannier in terms of water proofing. I wrote in the review that it needed more time to assess how good it was. I am please to say that the contents remained completely dry even after an hour of heavy rain. It is important to get the lid to cover properly - the material at the top of the bag is a lighter duty nylon closed by a drawstring, and relies on the lid to provide maximum water resistance. When the bag is full (as mine often is) you need to make sure that the elasticated flap is pulled over the bag just on case
I have used the pannier about 20 times or so now and so far it still seems to be holding up. The only issue so far seemed to be the screw/bolt covers inside that wore the contents. The solution in my earlier review of using a piece of old Karrimat seems to be working.
Sunday, 30 June 2013
Wednesday, 19 June 2013
The most awesome invention in the world
I was on a communication course today, and this was given as an example of how NOT to do it:

The most awesome invention in the world
Its awesome

The most awesome invention in the world
Its awesome
Monday, 17 June 2013
More Cycling Based Amusing Articles
Here are some mildly amusing Cycling articles.
Firstly here are some MAMIL related items:
BBC News - Rise of the Mamils (middle-aged men in lycra)
The Dailymash - Mid-Life Crisis Reduced To The Purchase Of Cycling Equipment
More Dailymash tomfoolery:
Britain trapped in downward spiral of bicycle addiction
Cyclists to create bike-themed superstate
Sunday, 16 June 2013
Finally Broke the 20+mph average
I have had a personal "aspiration" to ride at an average of 20mph or faster for the past 2 years or so. Its an "aspiration" rather than a target as its easier to not achieve it that way - see successive government "aspirations" as an example.
Three years or so ago when I re-started cycling with a purpose this would have seemed impossible. Last year there were a few rides where I got some high 19 averages but I was pretty well all out on these and could not see any improvements popping up and helping.
However this year there have been actually some signs that it might just be possible. I have pretty well given up on KOM chasing - there are too many people out there just outright faster than me now, so my general focus and plan (although its nothing as formal as that) has been to try to improve my ride average. Together with the fitting of a slightly more "he-man" (for me) 12-25 cassette on my Giant here I have been riding in one gear higher than I would normally for most rides now.
Anyway, last Tuesday I went out for a short run in the evening (to make up for fact that I had not cycled to work that day). I'd not really gone out with any aim - other than for about an hours ride, but realised about 10 minutes in that although my legs felt tired that actually I was going pretty quickly. I therefore decided to see what I could do in terms of ride average. The wind was "benign" so was not a flat out headwind but neither was it a tailwind either. I just put my head down and pushed. A couple of glances at my Garmin suggested that I should easily do it, although by the time I got to Monkspath Hall Road the head wind and a slight incline (average 1.2%) really sapped me, although I picked up the pace again on Widney Manor Lane and got a PR. I really pushed hard and got home with an average of 20.3mph over 18.2miles and 415 feet of ascent:
The satisfaction was immense and I have been feeling great for the past 5 days or so!
Here's a graph showing my performance with a linear fit for average speed:
 This was generated using my strava excel download and analysis tool which is still available here.
Three years or so ago when I re-started cycling with a purpose this would have seemed impossible. Last year there were a few rides where I got some high 19 averages but I was pretty well all out on these and could not see any improvements popping up and helping.
However this year there have been actually some signs that it might just be possible. I have pretty well given up on KOM chasing - there are too many people out there just outright faster than me now, so my general focus and plan (although its nothing as formal as that) has been to try to improve my ride average. Together with the fitting of a slightly more "he-man" (for me) 12-25 cassette on my Giant here I have been riding in one gear higher than I would normally for most rides now.
Anyway, last Tuesday I went out for a short run in the evening (to make up for fact that I had not cycled to work that day). I'd not really gone out with any aim - other than for about an hours ride, but realised about 10 minutes in that although my legs felt tired that actually I was going pretty quickly. I therefore decided to see what I could do in terms of ride average. The wind was "benign" so was not a flat out headwind but neither was it a tailwind either. I just put my head down and pushed. A couple of glances at my Garmin suggested that I should easily do it, although by the time I got to Monkspath Hall Road the head wind and a slight incline (average 1.2%) really sapped me, although I picked up the pace again on Widney Manor Lane and got a PR. I really pushed hard and got home with an average of 20.3mph over 18.2miles and 415 feet of ascent:
The satisfaction was immense and I have been feeling great for the past 5 days or so!
Here's a graph showing my performance with a linear fit for average speed:

Saturday, 15 June 2013
My Home Made Thule 561 in Use
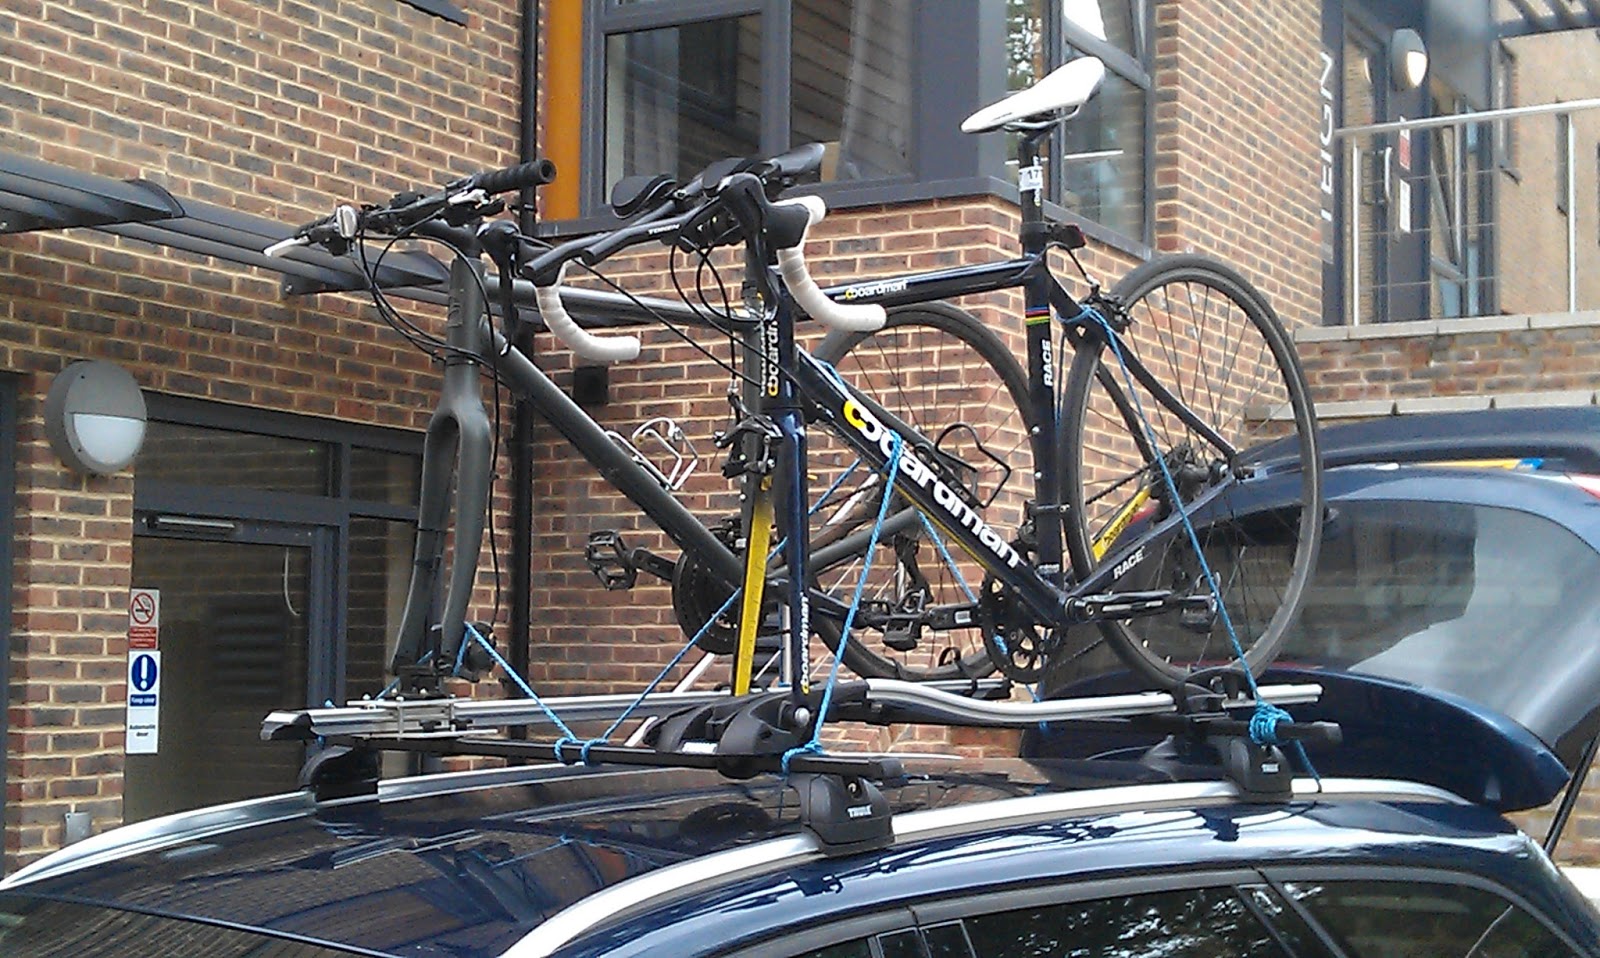
In an earlier post (here) I described the home made version of a Thule 561 that I made by modifying a Halfords roof cycle carrier. Here are some pictures of both my sons's bikes on the roof of my Focus estate - the Boardman in on the Thule rack whilst the Giant Seek Hybrid in on my version.
Being extra cautious I have used some rope between both bikes. The wind was very strong and we had a 150+ mile journey up the M5.


I was very pleased with the performance of my modification
Being extra cautious I have used some rope between both bikes. The wind was very strong and we had a 150+ mile journey up the M5.

 |
| The Giant on my version - its not going anywhere! |
 |
| The Boardman on the Thule Rack |

 |
| Detail of the front fork clamp |
Canal Ride
My wife and I went for a cycle ride along the Stratford Canal on the weekend of the late May Bank Holiday. The weather was gorgeous. Here are some pictures - the first I have taken using my phone whilst cycling:


Unfortunately she then had a puncture so we had to walk about a mile and a half to the pub and I cycled back to get the car


 |
| A heady 6 mph |

Unfortunately she then had a puncture so we had to walk about a mile and a half to the pub and I cycled back to get the car


Thursday, 6 June 2013
Tour Series Redditch - Tuesday 4 June 2013
My wife and I went to see the Pearl Izumi Tour Series in Redditch. We went last year as well.
It was a bit of a Tom Scully of Team Raleigh demonstration evening - he rode fantastically well
Here are some photos
It was a bit of a Tom Scully of Team Raleigh demonstration evening - he rode fantastically well
Here are some photos
 |
| On the neutral lap at the bottom of Unicorn Hill |
 |
| The leading 5 on about lap 5 |
 |
| The main Peleton on about lap 5 already ~20 secs down |
 |
| John Herety of Rapha Condor JLT in the pits |
 |
| The chasing Peleton at the top of Prospect Hill - Ed Clancy in 2nd Wheel |
 |
| The Peleton getting mixed up with the leading 5 riders about 6 laps from the end |
 |
| The Peleton getting mixed up with the leading 5 riders about 6 laps from the end - Ed Clancy just to the left of centre shot |
 |
| Matt Stephens and Ned Boulting in conference just before the end of the race |
 |
| Costa Fastest Lap Winner -Tom Scully |
 |
| Race Night Sprint Competition Winner -Tom Scully |
 |
| Series Sprint Winner -Tom Scully |
 |
| Race Winner - Tom Scully |
 |
| Team Race Winners - Metaltek Knights of Old |
 |
| Series Leaders - Team UK Youth |
Sunday, 2 June 2013
My Home Made Thule 561 Bike Carrier
Update 17 October 2013 Bit of an update here:My home made Thule 561 more details
Updated 15 June 2013
I am fortunate to have a number of bikes over the years and have bought various racks and carriers to carry them on a car. I initially bought something similar to this (the rack not the bike!):
The one I have is (looks) a bit better than this and in fact I have 2 of these. Its a quite high quality aluminium extrusion with a down tube clamping arrangement, which is lockable. The wheels are secured using self-locking cable straps much like pedal toe-clip straps. The frame clamp is a light weight steel tube.
Advantages of this type of rack are that the bike remains assembled whilst being carried and the down tube clamp provides a degree of stability
Disadvantages are
I also have something similar to this (not quite the same as mine is older):

The reason for getting one of these was that about 12 years ago I was lucky to start having company cars. The scheme I am on is fantastic and means that typically I don't keep a car for much more than 6 months, and I have a wide choice of vehicles (from 2 manufacturers). A down side to this (if there is such a thing!) is that its expensive to keep up with roof bars for all these cars and the days of a universal gutter mounting roof bar are long gone - all modern cars need a special fitting system. As such a tail gate system is a better compromise and fitted all the cars I had. However I was never that confidant about the overall robustness (especially with plastic bumpers) and always used some extra rope for belt and braces through the tailgate hinge to the bike.
In the end, because I wanted to transport my Focus Cayo and did not trust the tailgate rack for an expensive bike I bit the bullet and bought some "quality" roof bars - some Thule ones to be precise for a Freelander 2 I had at that time. I duly had a trial fitting of the bars - I can see why they cost more as they fit really well and securely and fitted my Focus to the roof with one of the Halfords roof carriers as above. I was less than impressed.
I was concerned about the clamping arrangement for the frame - the frame is quite a large diameter which meant that the clamp was awkward to fit and then I was nervous about how much clamp load to apply to secure the bike as it moved more than I wanted even when I had reached the maximum load I felt comfortable with for the clamp. In reality I know that carbon fibre frames are very strong, but a down tube clamp load is not what they are designed for.
The solution for this was a relatively easy solution to get a Thule 561 Cycle Carrier

This is an excellent piece of equipment and is, of the 3 bike carriers I have, by far the best system for carrying a bike. Almost all of the load of holding the bike to the rack is done by the quick release clamp through the front fork. As this part of the bike is designed for high loading then there is no issue with this. The retention strap for the rear wheel is really only to stop the wheel bouncing. The carrier is also very simple and quick to fit to the roof bars. Both fixing points to the roof bar have an adjustable over-centre clamp. The rear clamp is just clamped, but the front is lockable, as is the fork clamp.
I have found with experience that you do need to do these really quite tight or the rack will move slightly.
Once the roof bars are on the roof it takes no more that 10 minutes to fit the 561 and bike and secure it all. It really is excellent.
After a couple of years and the growing interest of my son in cycling it became more necessary to get a second quality carrier like the 561. The easy option would have been to just buy a 2nd one, however being an engineer and having something to start from I felt that I could make one using one of the Halfords units as a starting point. So this is what I did.
The Mark 1
The original plan was to make some form of quick release fork mounting mechanism using a spare front axle that I would fix to the aluminium channel of the Halfords unit. I had given this some thought and had in my mind a fabricated solution of some sort. It needed to be fabricated as I don't have access to either machine tools or any welding equipment, and although my father does have some machines and a gas torch welder these are not easily accessible. Therefore the plan was to make something using various angle and box sections.
However another project I was working on had involved some improvements to my garage and as part of this was thinking about some secure bike racking. Whilst searching for this I came across the following from Saris:

The aluminium was order via an eBay supplier. I got a 500mm length of the rectangular section cut in 3 pieces (2 off 125mm and 1 off 250mm) and some 5mm aluminium plate - a 250mm square cut into 2 off 125mm square and a 125x250mm piece. The reason for the definition of the sizes is that 2 cuts were included in the price. The section was sawn and the plate guillotined, and the sizes were within 0.5mm. I was very happy with the material and the service and would use the supplier again.
This all looked great and worked in the garage. However when fitted to the car a problem came to light. The way the the end of the carrier is fitted to the roof bars is via a metal pressing that rests in the bottom of the V of the section. In normal use this clamp is the rear of the carrier and takes no load, whilst the other end is clamped with a more stiff structure (not shown).
Here is a couple of pictures that sort of show how the rack is clamped at one end - the end I added my new design to:


Given that this end is normally just having the rear wheel sitting in it its a more that suitable design. My design however had the front forks mounted here which put all the side forces onto the extrusion which was not supported
As a result the highest load from the bike is through my new additions, and the design had no stiffness where needed.I t was quite unfit for purpose and a complete redesign was required.
This led to the mark 2 version:
Here are some pictures of a much more substantial version that is fit for purpose.
It was used to bring back one of my sons bikes from Exeter University. 150+ motorway miles with very strong winds proved to be no problem - the bike was securely held and I was very happy
More words to follow describing the reasons for the redesign strategy at a later date.
Updated 15 June 2013
I am fortunate to have a number of bikes over the years and have bought various racks and carriers to carry them on a car. I initially bought something similar to this (the rack not the bike!):
 |
| Halfords "middle of the range" roof carrier |
The one I have is (looks) a bit better than this and in fact I have 2 of these. Its a quite high quality aluminium extrusion with a down tube clamping arrangement, which is lockable. The wheels are secured using self-locking cable straps much like pedal toe-clip straps. The frame clamp is a light weight steel tube.
Advantages of this type of rack are that the bike remains assembled whilst being carried and the down tube clamp provides a degree of stability
Disadvantages are
- the bike is very tall when trying to fit to the rack - it was almost impossible on a Land Rover Freelander 2
- the down tube clamp could provide more lateral stability and would be better if the base was wider to give more triangulation
- for fat down tubes the clamp needs to be dis-assembled before it will go round the tube and then needs re-assembly once held around which is very difficult one-handed
- the overall height of the vehicle becomes very tall once a bike is fitted
I also have something similar to this (not quite the same as mine is older):
The reason for getting one of these was that about 12 years ago I was lucky to start having company cars. The scheme I am on is fantastic and means that typically I don't keep a car for much more than 6 months, and I have a wide choice of vehicles (from 2 manufacturers). A down side to this (if there is such a thing!) is that its expensive to keep up with roof bars for all these cars and the days of a universal gutter mounting roof bar are long gone - all modern cars need a special fitting system. As such a tail gate system is a better compromise and fitted all the cars I had. However I was never that confidant about the overall robustness (especially with plastic bumpers) and always used some extra rope for belt and braces through the tailgate hinge to the bike.
In the end, because I wanted to transport my Focus Cayo and did not trust the tailgate rack for an expensive bike I bit the bullet and bought some "quality" roof bars - some Thule ones to be precise for a Freelander 2 I had at that time. I duly had a trial fitting of the bars - I can see why they cost more as they fit really well and securely and fitted my Focus to the roof with one of the Halfords roof carriers as above. I was less than impressed.
I was concerned about the clamping arrangement for the frame - the frame is quite a large diameter which meant that the clamp was awkward to fit and then I was nervous about how much clamp load to apply to secure the bike as it moved more than I wanted even when I had reached the maximum load I felt comfortable with for the clamp. In reality I know that carbon fibre frames are very strong, but a down tube clamp load is not what they are designed for.
The solution for this was a relatively easy solution to get a Thule 561 Cycle Carrier

This is an excellent piece of equipment and is, of the 3 bike carriers I have, by far the best system for carrying a bike. Almost all of the load of holding the bike to the rack is done by the quick release clamp through the front fork. As this part of the bike is designed for high loading then there is no issue with this. The retention strap for the rear wheel is really only to stop the wheel bouncing. The carrier is also very simple and quick to fit to the roof bars. Both fixing points to the roof bar have an adjustable over-centre clamp. The rear clamp is just clamped, but the front is lockable, as is the fork clamp.
I have found with experience that you do need to do these really quite tight or the rack will move slightly.
Once the roof bars are on the roof it takes no more that 10 minutes to fit the 561 and bike and secure it all. It really is excellent.
After a couple of years and the growing interest of my son in cycling it became more necessary to get a second quality carrier like the 561. The easy option would have been to just buy a 2nd one, however being an engineer and having something to start from I felt that I could make one using one of the Halfords units as a starting point. So this is what I did.
The Mark 1
The original plan was to make some form of quick release fork mounting mechanism using a spare front axle that I would fix to the aluminium channel of the Halfords unit. I had given this some thought and had in my mind a fabricated solution of some sort. It needed to be fabricated as I don't have access to either machine tools or any welding equipment, and although my father does have some machines and a gas torch welder these are not easily accessible. Therefore the plan was to make something using various angle and box sections.
However another project I was working on had involved some improvements to my garage and as part of this was thinking about some secure bike racking. Whilst searching for this I came across the following from Saris:

This was exactly what I had been looking for and at £16.99 from Chain Reaction Cycles was cheap enough to take a punt at.
Having acquired the most complex piece rather than having to make it I was enthused to actually finish the project. The plan was to use a rectangular section fixed to the aluminium extrusion and then mount the Saris clamp to that section. Here is a photo of it completed to show the aim.
 |
| End-on view of mount showing construction |
 |
| Another view to show construction |
 |
| Another View |
 |
| Overhead view |
 |
| Side View |
The aluminium was order via an eBay supplier. I got a 500mm length of the rectangular section cut in 3 pieces (2 off 125mm and 1 off 250mm) and some 5mm aluminium plate - a 250mm square cut into 2 off 125mm square and a 125x250mm piece. The reason for the definition of the sizes is that 2 cuts were included in the price. The section was sawn and the plate guillotined, and the sizes were within 0.5mm. I was very happy with the material and the service and would use the supplier again.
This all looked great and worked in the garage. However when fitted to the car a problem came to light. The way the the end of the carrier is fitted to the roof bars is via a metal pressing that rests in the bottom of the V of the section. In normal use this clamp is the rear of the carrier and takes no load, whilst the other end is clamped with a more stiff structure (not shown).
Here is a couple of pictures that sort of show how the rack is clamped at one end - the end I added my new design to:


Given that this end is normally just having the rear wheel sitting in it its a more that suitable design. My design however had the front forks mounted here which put all the side forces onto the extrusion which was not supported
As a result the highest load from the bike is through my new additions, and the design had no stiffness where needed.I t was quite unfit for purpose and a complete redesign was required.
This led to the mark 2 version:
Here are some pictures of a much more substantial version that is fit for purpose.
It was used to bring back one of my sons bikes from Exeter University. 150+ motorway miles with very strong winds proved to be no problem - the bike was securely held and I was very happy
More words to follow describing the reasons for the redesign strategy at a later date.
 |
| The Mark 2 version - end on view |
 |
| The Mark 2 version - side view |
 |
| The Mark 2 version - another end on view |
 |
| The Mark 2 version - yet another end on view |
 |
| The Mark 2 version - another side view |
 |
| The Mark 2 version - end on view |
Subscribe to:
Posts (Atom)